Guia de controle de versão da Lightfarm Studios para as equipes de arte, design e desenvolvimento — do primeiro login ao fluxo diário de submissão.
Introdução
Este manual apresenta o fluxo de trabalho oficial da Lightfarm Studios para o Perforce Helix Core, cliente P4V. Ele foi desenvolvido para servir como referência rápida no dia a dia e como material de treinamento para novos integrantes da equipe.
Em março de 2025 a Perforce renomeou oficialmente o "Helix Core" para "Perforce P4", unificando a suíte de produtos sob a marca "P4 Platform". Os comandos, o cliente P4V e os arquivos de configuração continuam com os mesmos nomes técnicos — apenas a marca mudou. As duas nomenclaturas ("Helix Core" e "P4") são usadas de forma intercambiável na documentação oficial e neste manual.
Como usar este manual
O conteúdo está organizado em seis partes, que podem ser lidas em sequência (para quem está começando) ou consultadas pontualmente (para quem já usa o P4V no dia a dia):
- Conceitos e terminologia — o vocabulário essencial do Perforce.
- Instalação e conexão — como preparar a estação de trabalho e conectar ao servidor da Lightfarm.
- Fluxo diário de trabalho — sincronizar, editar, submeter.
- Streams e branching — como o pipeline da Lightfarm organiza branches.
- Resolução de conflitos comuns — o que fazer quando algo dá errado.
- FAQ e troubleshooting — respostas rápidas para as dúvidas mais frequentes.
Deixe esta opção DESLIGADA durante a criação do workspace. Se ativada, ela baixará todos os arquivos de todos os projetos, desperdiçando espaço em disco e tempo de sincronia.
Resumo visual
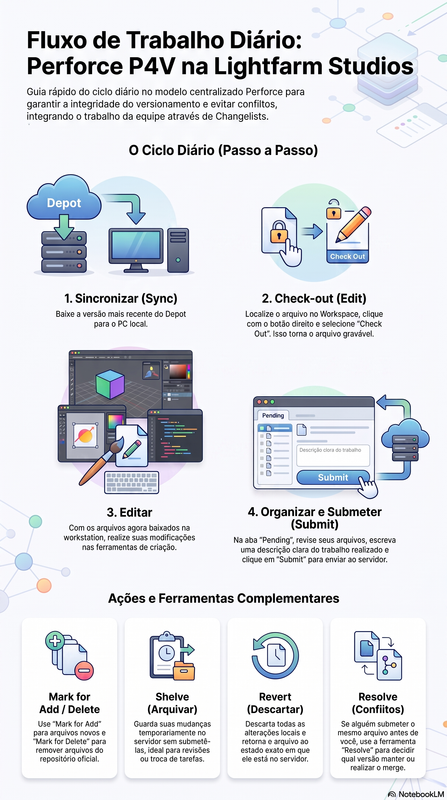
A imagem abaixo resume, em um único painel, os conceitos essenciais e o fluxo diário de trabalho detalhados nas próximas seções. Funciona como um cartaz de referência rápida — mas não substitui a leitura das seções completas.
01 Conceitos e terminologia
Antes de operar o P4V no dia a dia, é importante entender alguns termos-chave. Esta seção serve como um glossário de referência.
Modelo centralizado (por que não é como o Git)
O Perforce usa um modelo centralizado de controle de versão (CVCS — Centralized Version Control System). Isso significa que existe um único servidor central (o Depot) que guarda a versão "oficial" de todos os arquivos e todo o histórico do projeto. Ao contrário de ferramentas como o Git, o Helix Core opera sob uma filosofia de centralização, ideal para o peso dos projetos de CGI.
Essa arquitetura estabelece uma Única Fonte da Verdade (Single Source of Truth — SSOT): o servidor central retém o histórico completo, e o computador do artista (Workspace) apenas faz o download dos arquivos exatos necessários para o momento atual, economizando armazenamento local e banda de rede.
O fluxo básico de trabalho é:
- Sincronizar (sync) os arquivos do servidor para a máquina local.
- Fazer check-out do arquivo antes de editá-lo.
- Editar o arquivo localmente.
- Submeter (submit) as alterações de volta ao servidor.
No Perforce, o check-out acontece antes de editar o arquivo, não depois. Arquivos sincronizados ficam somente leitura até serem explicitamente marcados para edição — a principal fonte de confusão para quem vem de outros sistemas de versionamento.
Depot
É o repositório central, hospedado no servidor da Lightfarm Studios, onde todos os arquivos do projeto e seu histórico completo ficam armazenados. É a "fonte da verdade" única — tudo que a equipe produz eventualmente vive lá. Os artistas não editam arquivos diretamente no Depot.
Workspace (área de trabalho)
O workspace é o mapeamento entre uma pasta no computador de um usuário e uma parte específica do depot no servidor — sua "mesa de trabalho" local. Ele define quais arquivos aquele usuário sincroniza e em qual pasta local eles aparecem.
Cada pessoa da equipe deve ter seu próprio workspace, configurado apenas com as pastas do depot relevantes para sua função (arte, design, programação, etc.), evitando sincronizar o projeto inteiro sem necessidade.
Changelist (lista de mudanças)
Uma changelist agrupa um conjunto de arquivos alterados que serão submetidos juntos, como uma unidade atômica: ou todos os arquivos da changelist são gravados no depot, ou nenhum é. Se uma malha 3D e sua textura são alteradas juntas, sobem na mesma changelist; se a rede cair, o envio é cancelado por inteiro, evitando um projeto quebrado no servidor.
- Pending (pendente): mudanças em andamento, ainda não submetidas.
- Shelved (arquivada): mudanças guardadas temporariamente no servidor sem serem submetidas — úteis para revisão de código por outra pessoa, ou para trocar de tarefa sem perder o progresso.
Ações básicas sobre arquivos
| Ação | O que faz |
|---|---|
| Sync | Baixa a versão mais recente do depot para o workspace local. |
| Check-out (Edit) | Marca um arquivo existente para edição, tornando-o gravável. |
| Add | Marca um arquivo novo (que ainda não existe no depot) para ser adicionado. |
| Delete | Marca um arquivo para remoção do depot. |
| Move/Rename | Move ou renomeia um arquivo versionado, preservando seu histórico. |
| Submit | Envia a changelist com as alterações para o depot, tornando-as oficiais. |
| Revert | Descarta as alterações locais e devolve o arquivo ao estado do depot. |
| Shelve | Guarda uma changelist pendente no servidor sem submetê-la. |
Streams
Streams organizam branches (ramificações) em uma hierarquia de pai e filho, o que simplifica a criação, o merge e a integração entre eles — especialmente útil em desenvolvimento de jogos, onde diferentes equipes trabalham em features, releases ou protótipos separados.
Existem também as Sparse Streams, um tipo de branch leve que pode ser criado quase instantaneamente, sem duplicar fisicamente todos os arquivos.
P4V (P4 Visual Client)
É a interface gráfica oficial para acessar o servidor Perforce. No P4V, o painel esquerdo tem as abas Depot e Workspace, e o painel direito traz abas configuráveis (Pending, Submitted, History, etc.), reabertas a qualquer momento pelo menu View.
Ferramentas de histórico e visualização
- Revision Graph: visualiza graficamente branches e integrações entre eles.
- Time-lapse View: mostra lado a lado todas as versões de um arquivo, indicando linha a linha quem mudou o quê e quando.
- Diff Summary: compara versões de arquivos, incluindo comparação com changelists shelved.
Arquivos binários e Exclusive Checkout
A principal razão de escolha do Perforce na indústria de VFX e games é sua arquitetura otimizada para arquivos binários pesados e não-mesclaveis (ex.: .ma .blend .zpr .exr .psd .uasset).
Ao invés de tentar fazer "merge" de arquivos impossíveis (como uma geometria 3D), o Helix Core utiliza um Cadeado Global (Exclusive Checkout / Lock). Quando um artista solicita edição (Check Out) de um arquivo configurado dessa forma, ninguém mais no estúdio consegue editá-lo até que o trabalho seja submetido — eliminando a perda de trabalho por conflito de sobreposição.
Versionamento: linearidade e imutabilidade
O histórico do Helix Core é linear e imutável, permitindo reversão exata para qualquer revisão anterior em caso de bugs. Combinado com o conceito de changelists atômicas, isso garante que o Depot nunca fique em um estado inconsistente.
Segurança e permissões
O acesso aos arquivos pode ser controlado por diretório ou por arquivo individual (ACLs / Tabela de Proteções), com registro completo de auditoria — protegendo a Propriedade Intelectual (IP) da Lightfarm:
| Recurso | Descrição e aplicação prática |
|---|---|
| Permissões por pasta/arquivo | Um freelancer pode ter acesso apenas à pasta específica do seu asset, ocultando o restante do projeto. |
| Níveis de acesso base | Diretores (apenas leitura), Artistas (escrita), Leads/Admins (super admin, com poder de desbloquear arquivos esquecidos). |
| Restrição por endereço de IP | Bloqueia o download de arquivos ultrassecretos caso o usuário não esteja na rede interna ou na VPN do estúdio. |
02 Instalação e conexão
Esta seção cobre a preparação da estação de trabalho e a primeira conexão ao servidor Perforce da Lightfarm Studios.
Download e instalação do P4V
- Acesse a página oficial de downloads da Perforce. -> https://www.perforce.com/downloads.
- Acessando o link do item 1. Ocorrerá o direcionamento para a página abaixo.

Página de downloads da Perforce — em P4 Visual Client, clique em Customer Download. - Baixe o "Helix Visual Client (P4V)" correspondente ao sistema operacional em uso (Windows/macOS/Linux).
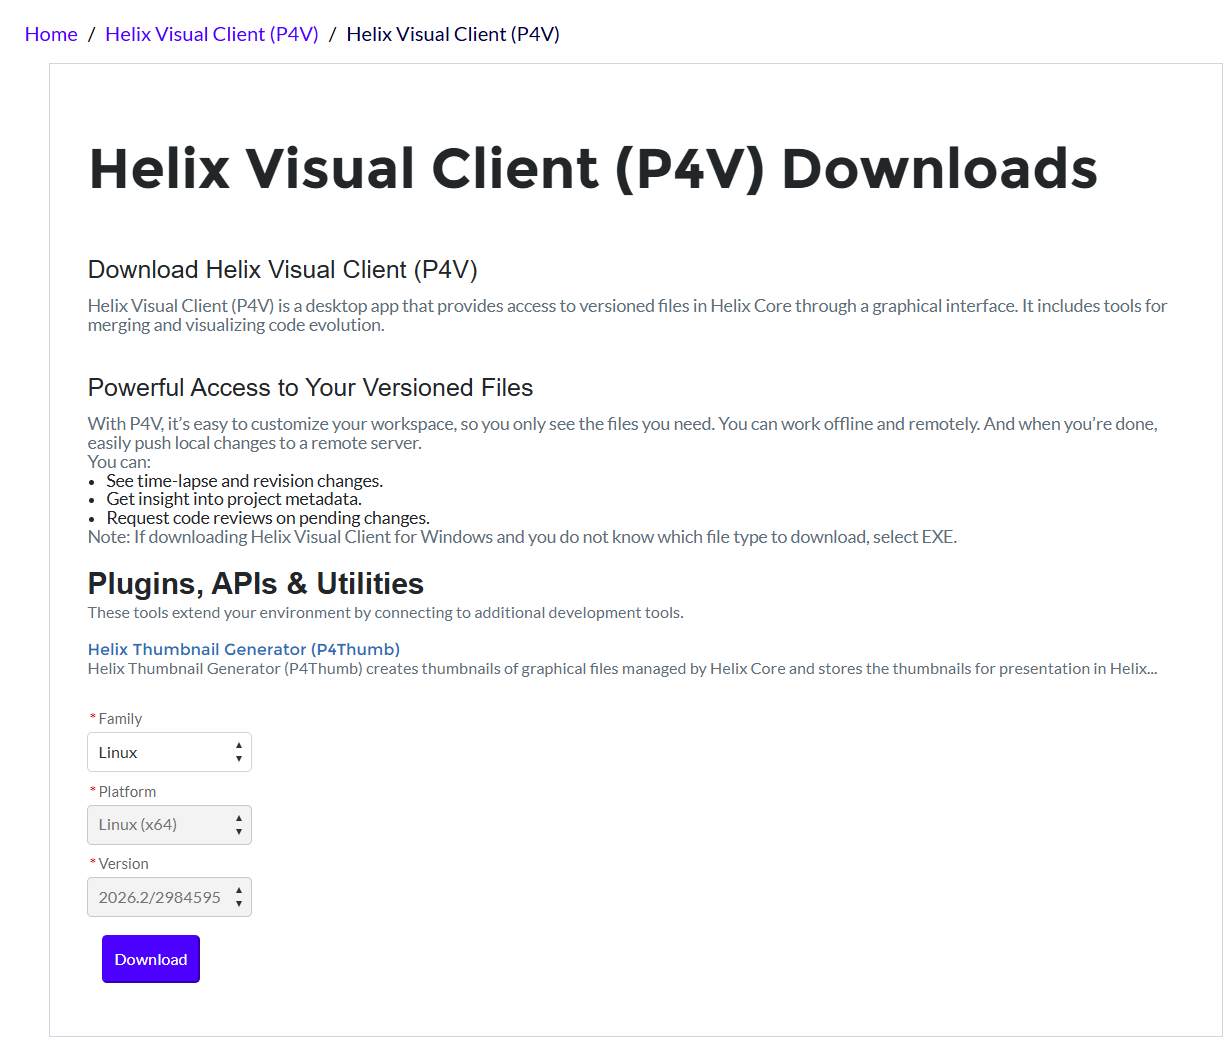
Página do Helix Visual Client (P4V) — selecione o sistema operacional e a versão para baixar. - Execute o instalador e siga as etapas padrão de instalação.
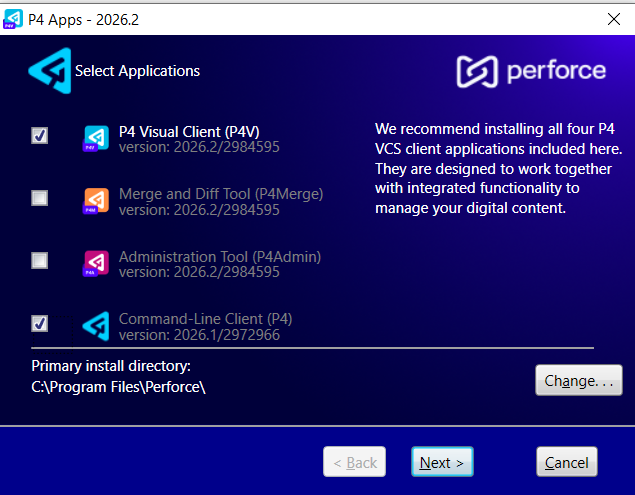
Instalação do P4V — seleção de componentes. 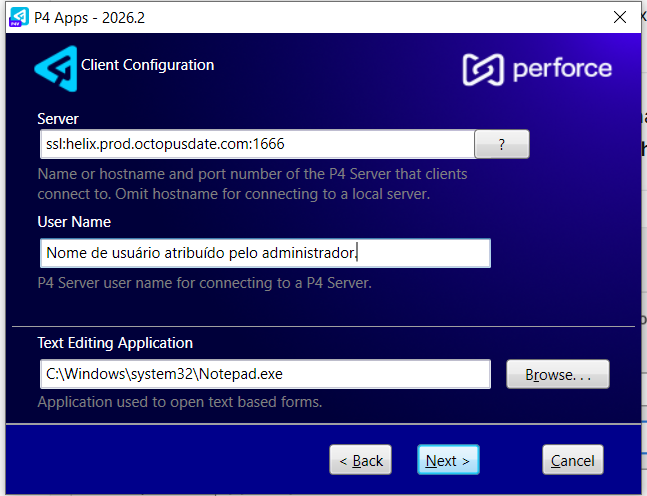
Instalação do P4V — passo 2. 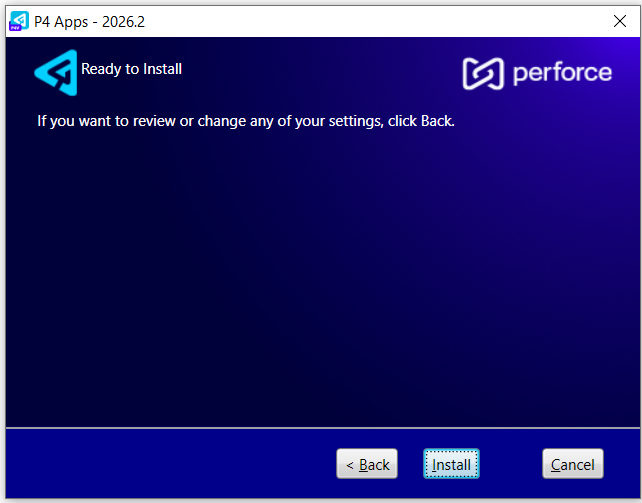
Instalação do P4V — passo 3. 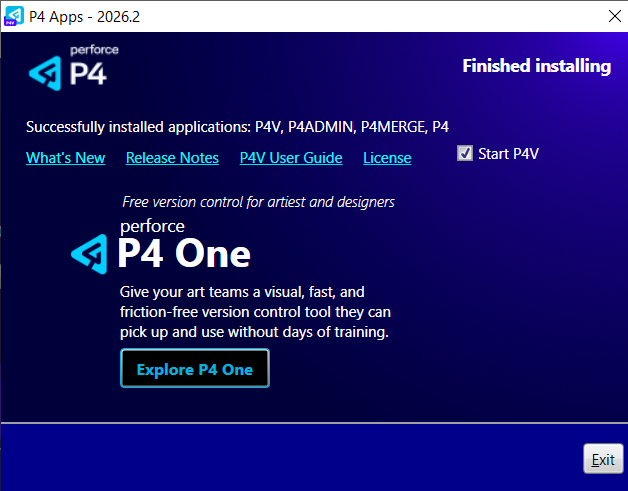
Instalação do P4V — término.
Primeira conexão ao servidor
Abra o P4V. Na janela "Open Connection", preencha:
| Campo | Valor / descrição |
|---|---|
| Server | ssl:helix.prod.octopusdate.com:1666 — endereço oficial do servidor da Lightfarm Studios. |
| User | Nome de usuário atribuído pelo administrador. |
| Workspace | Nome do workspace a ser usado ou criado nesta conexão (ver seção seguinte). Deixe em branco no primeiro login. |
Na primeira conexão: O Helix perguntará sobre aceitar uma chave de acesso. Marque Trust this fingerprint e clique em Connect. Em seguida, escolha o Character Encoding: UTF-8.

Clique em OK.
- Caso o sistema ainda não esteja configurado, aparecerá a janela de "Character Encoding" — selecione UTF-8.
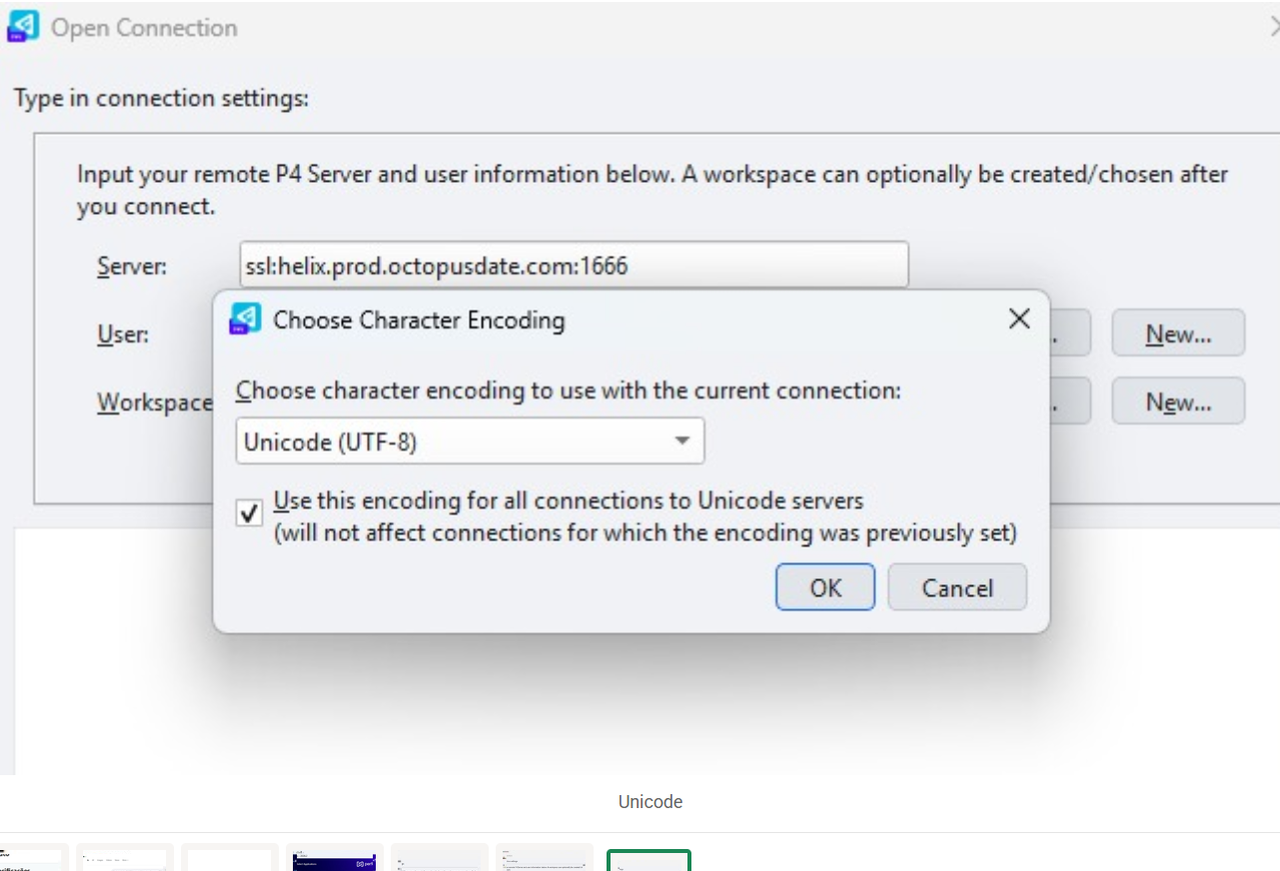
Janela Character Encoding — selecione a opção UTF-8. - Em seguida, insira sua senha e clique em OK.
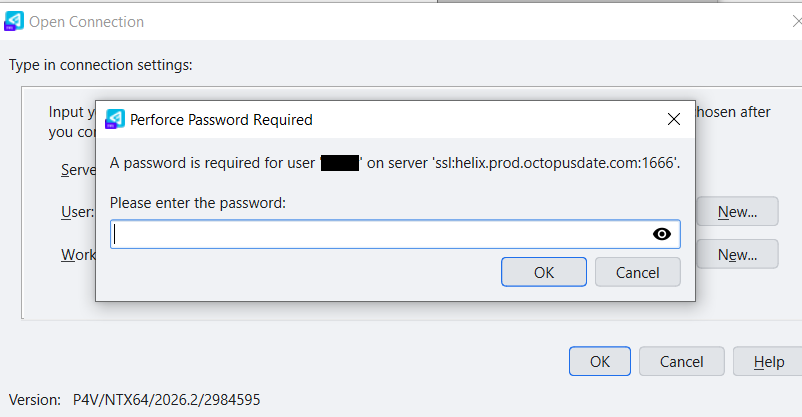
Informe a senha e clique em OK. - A interface principal do P4V carrega, exibindo o repositório do servidor (Depot).
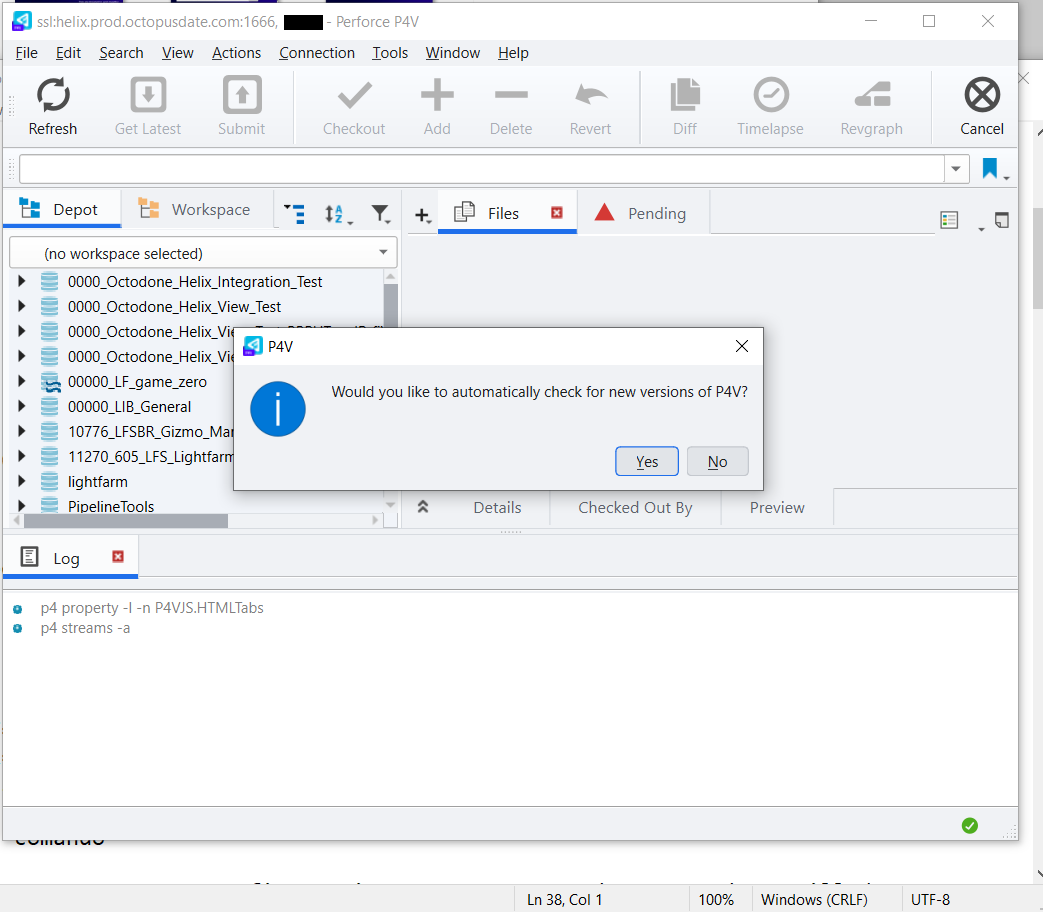
Interface principal do P4V — exibindo o repositório do servidor (Depot).
Criando o workspace
Todo o trabalho no Perforce é feito localmente — é necessário criar um Workspace para mapear os arquivos do servidor para o seu HD.
- No menu suspenso de Workspace, selecione New Workspace…
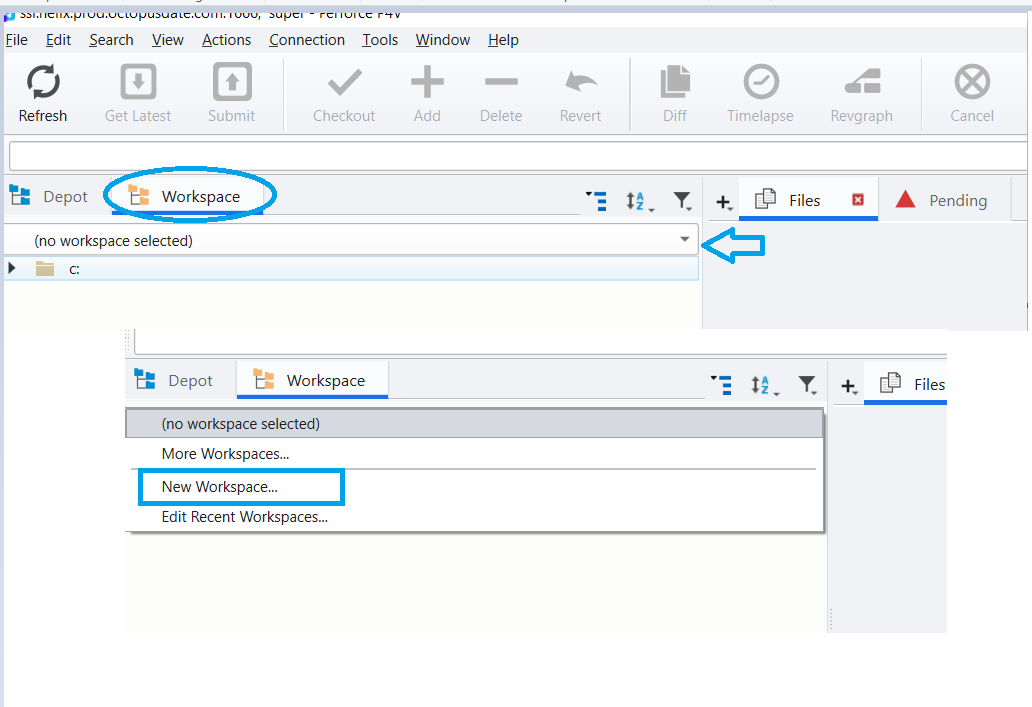
No menu de Workspace, escolha New Workspace… - Preencha Workspace name seguindo o padrão
nomeArtista_LF(ex.:joao_LF,maria_LF). - Em Workspace root, defina o caminho local (ex.:
C:\Lightfarm_Jobs\<workspace>). Importante: O caminho NÃO pode conter espaços, e deve estar em uma pasta local do disco (ex.:C:\Lightfarm_Jobs).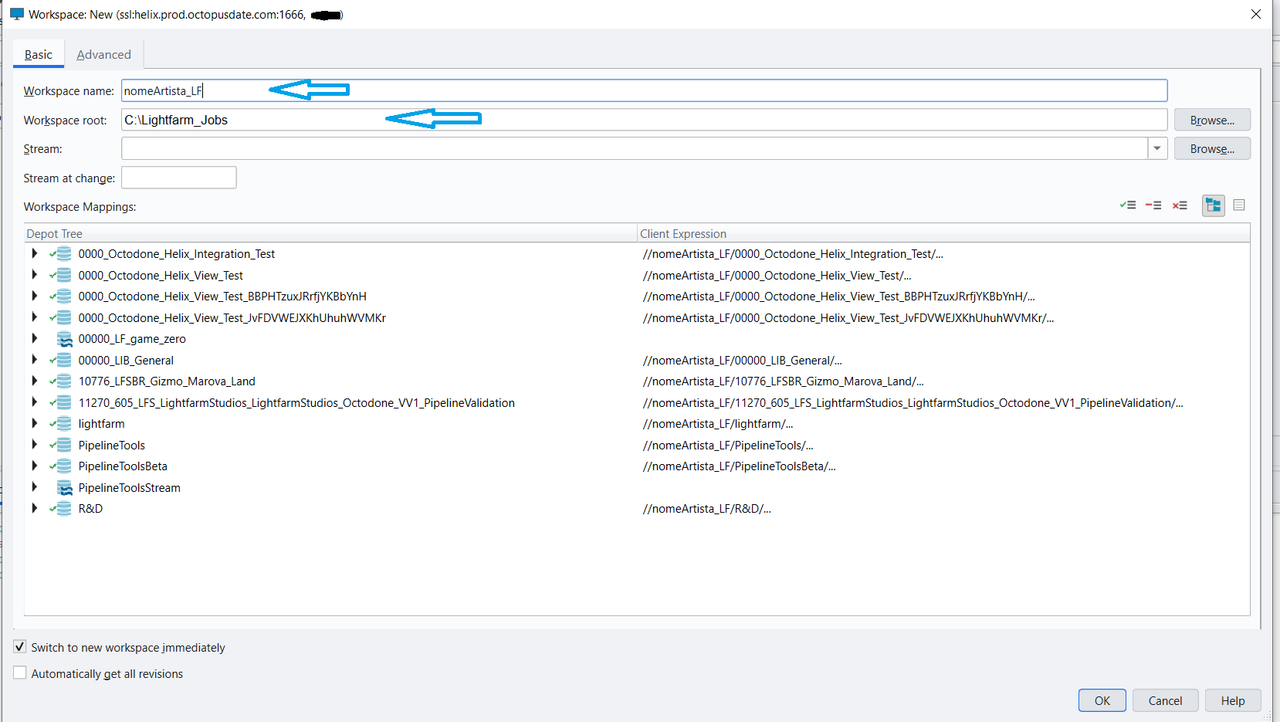
Configuração do novo Workspace — Workspace root em pasta local. - Clique em OK para finalizar.
NÃO crie o workspace em pastas sincronizadas com Dropbox, Google Drive, OneDrive ou Megasync. Estes serviços podem alterar a estrutura dos arquivos, quebrando a sincronia do Helix Core. Use sempre uma pasta local convencional no seu disco.
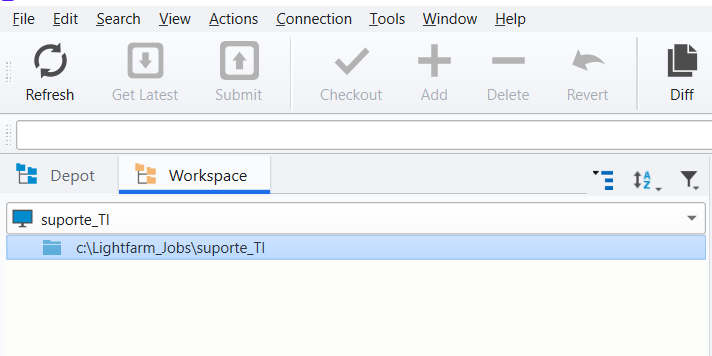
Nomeie o workspace de forma padronizada; mapeie apenas as pastas do depot relevantes para a sua função; evite sincronizar o depot inteiro sem necessidade — isso sobrecarrega disco e rede.
03 Fluxo diário de trabalho
A seção de consulta mais frequente: o passo a passo do que fazer todos os dias ao iniciar e finalizar o trabalho.
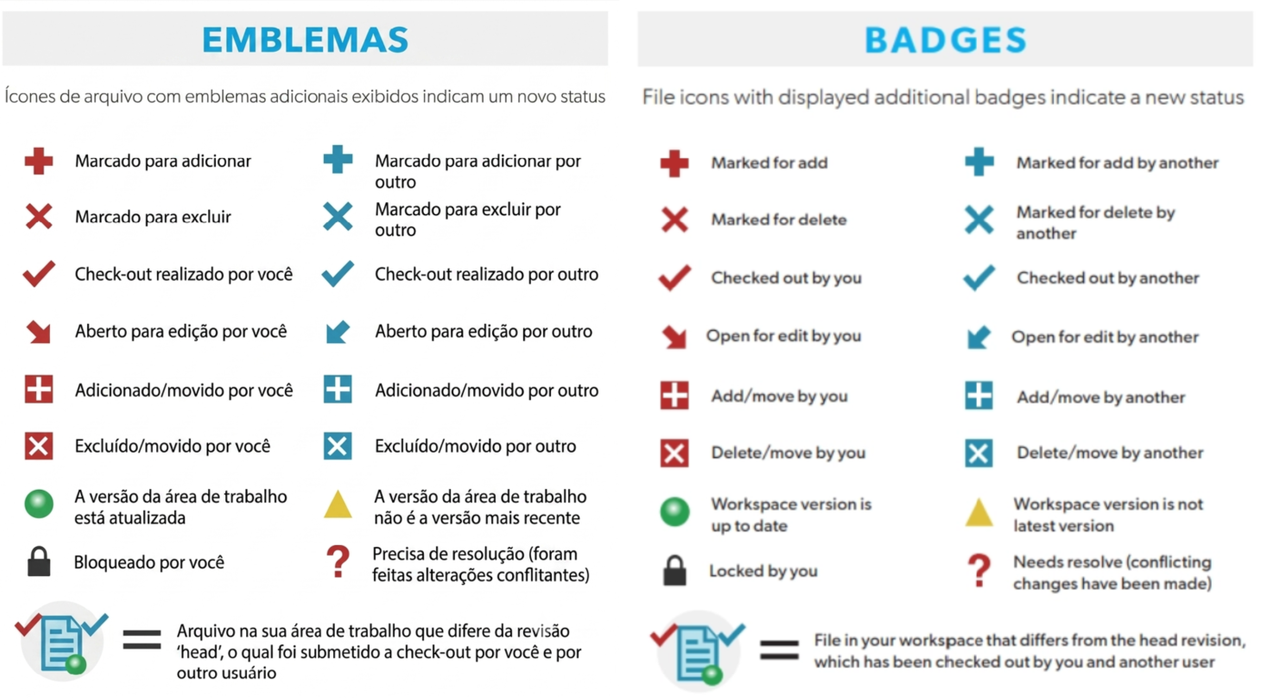
Segundo o Help do Perforce Helix Core, estes são os possíveis status de um arquivo no servidor, e as indicações correspondentes a estes status no formato e badges (emblemas).
Início do dia: sincronizar (Get Latest Revision)
- Abra o P4V e confirme que está conectado ao workspace correto.
- Na aba Depot, navegue até a pasta desejada (ex.:
PipelineTools).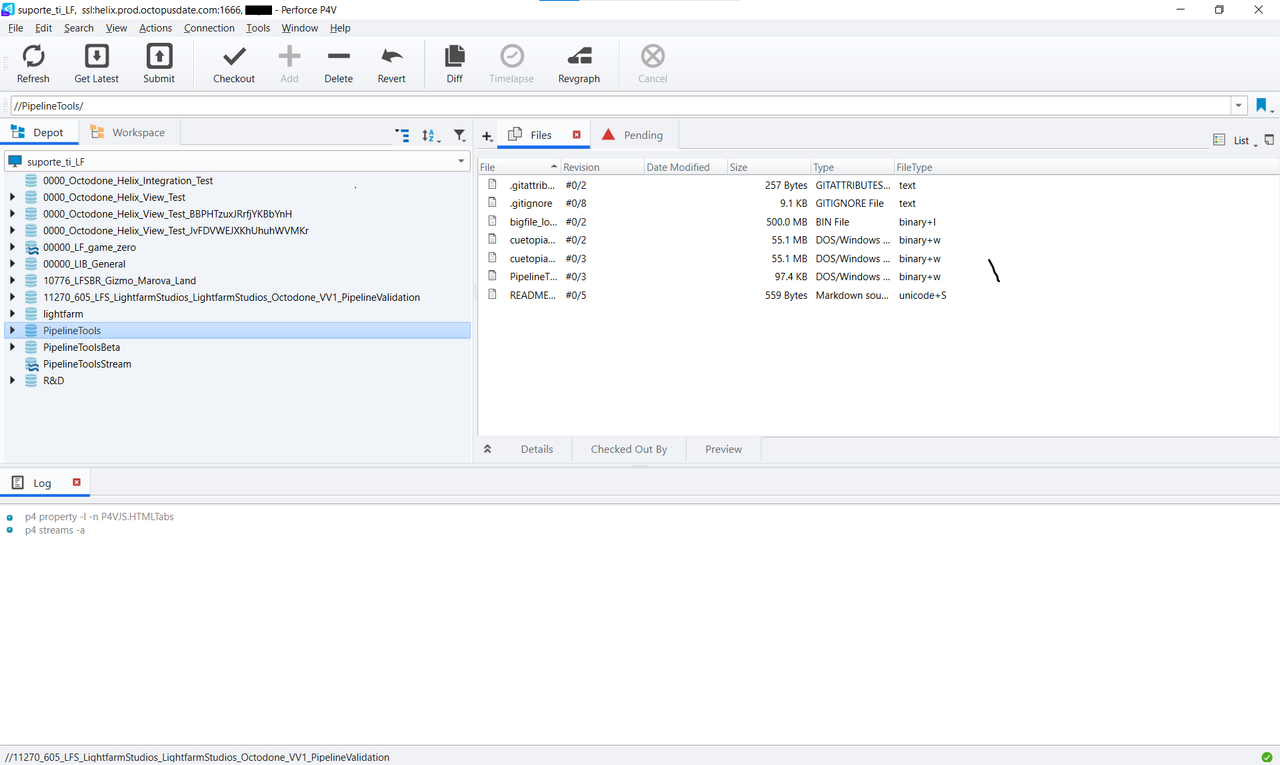
Aba Depot — navegue até a pasta do projeto. - Clique com o botão direito e selecione Get Latest Revision.
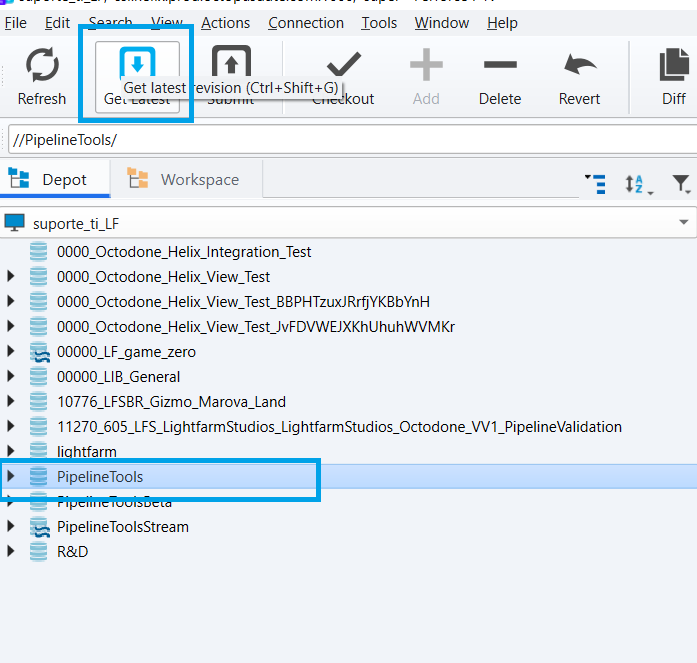
Clique com o botão direito e selecione Get Latest Revision. Ou
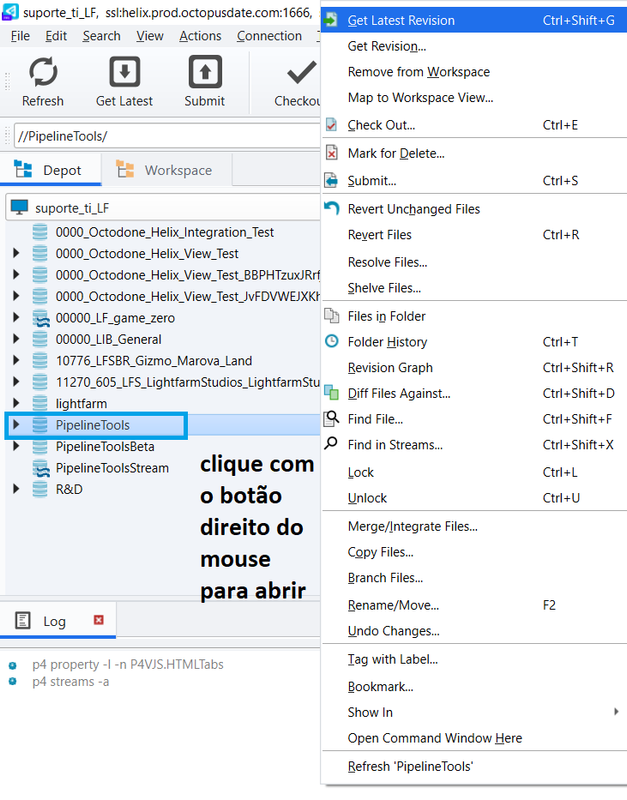
Alternativa — Get Latest Revision pela interface. - Aguarde a barra de progresso concluir o download para o workspace local.
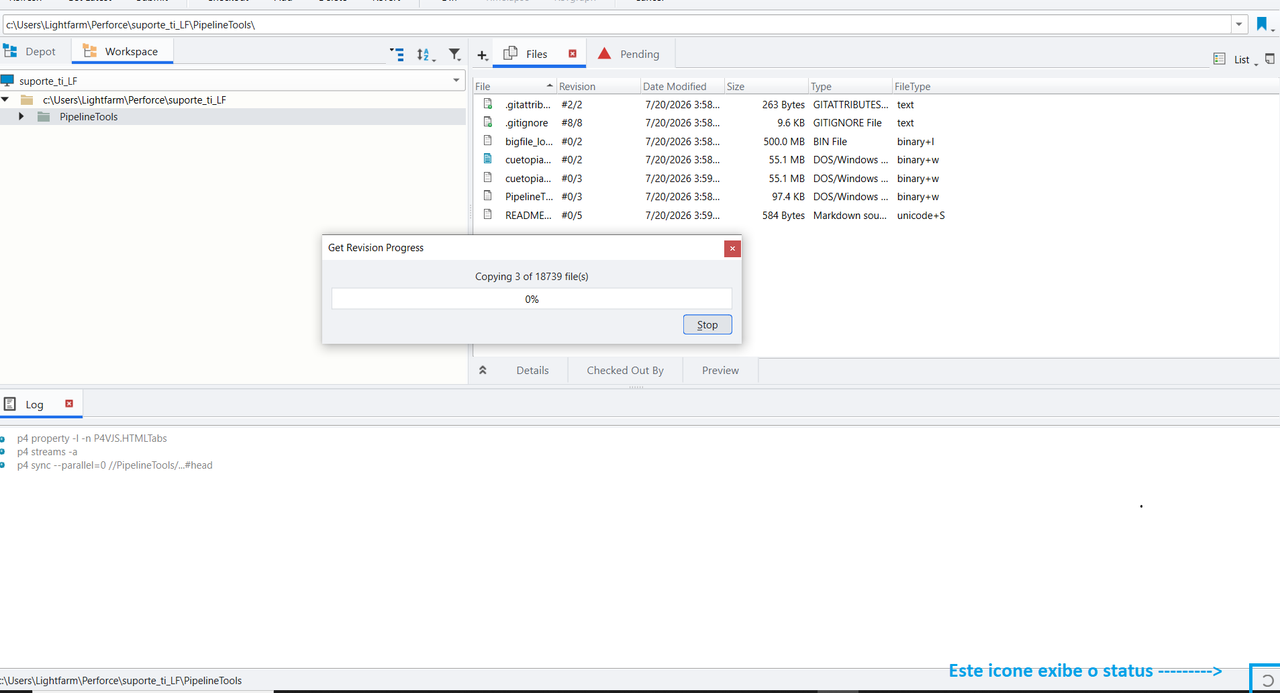
Barra de progresso do Get Latest Revision em andamento.
Sempre faça Sync antes de começar a trabalhar, para reduzir a chance de conflitos maiores mais tarde.
Acessando os arquivos localmente
- Clique com o botão direito sobre a pasta baixada.
- Vá em Show In → Explorer.
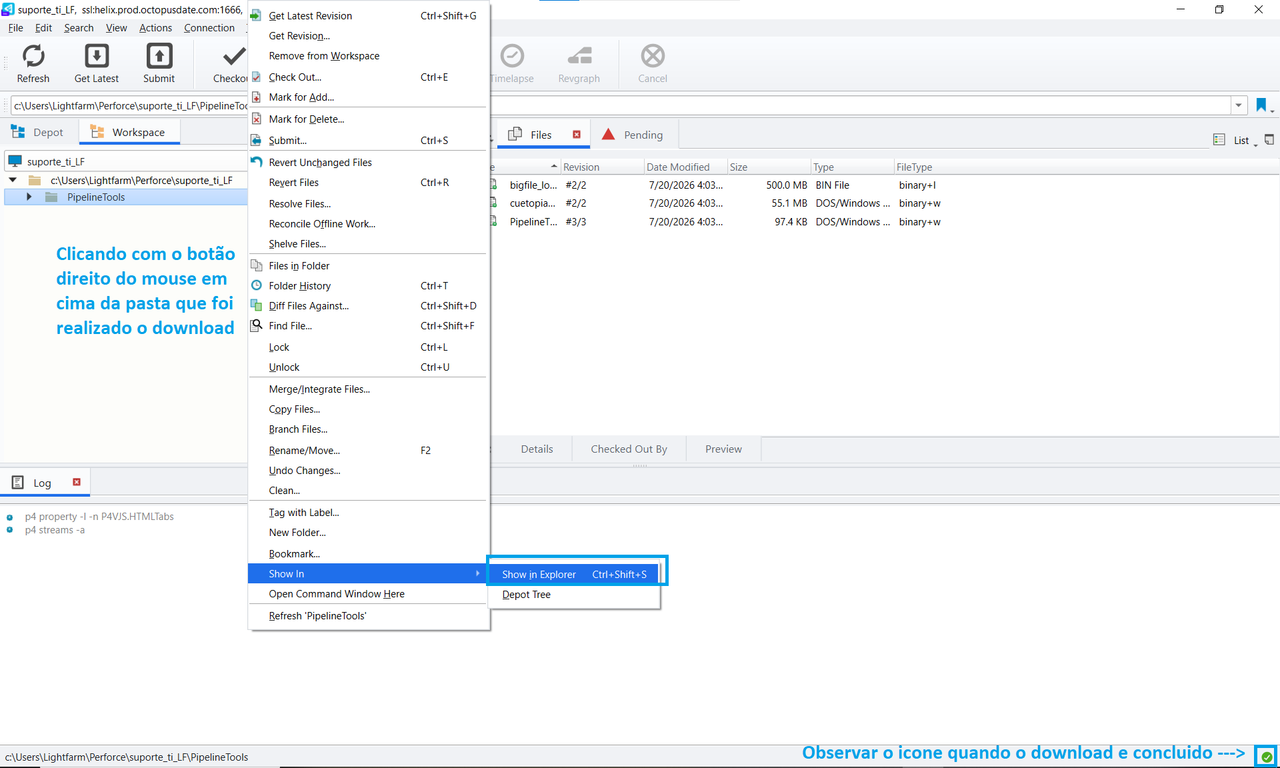
Explorer aberto no diretório local dos arquivos sincronizados. - O Explorer abre exatamente no diretório local onde os arquivos estão salvos.
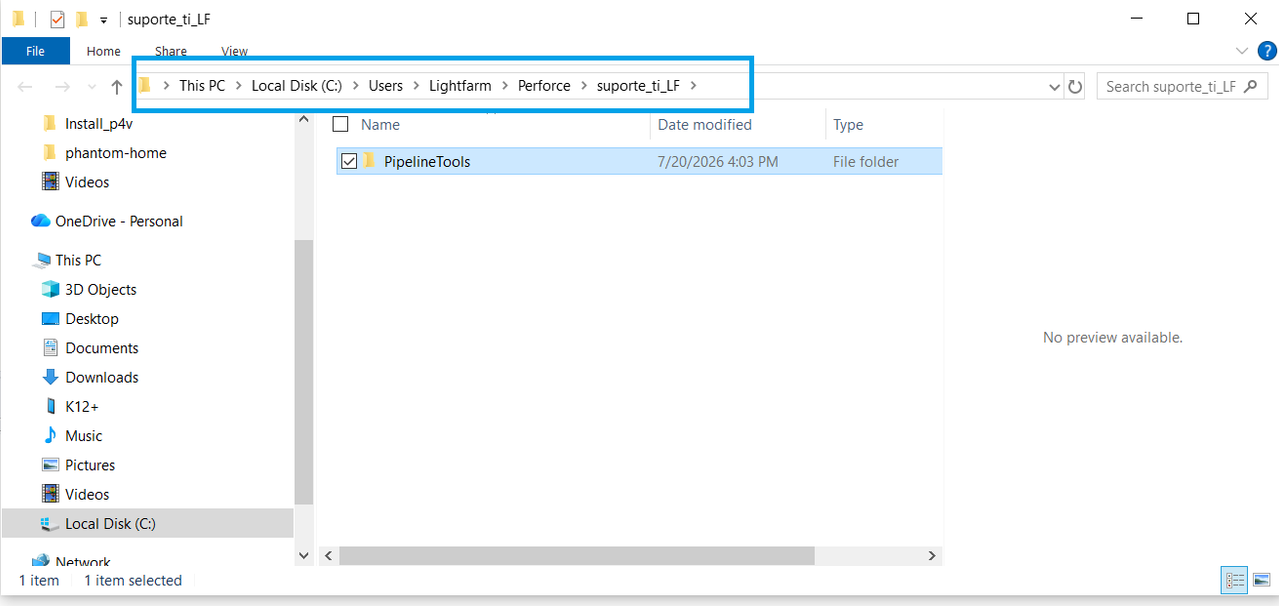
Explorer aberto exatamente no diretório local onde os arquivos estão salvos.
Fazendo check-out de um arquivo
- Localize o arquivo na aba Workspace ou Depot.
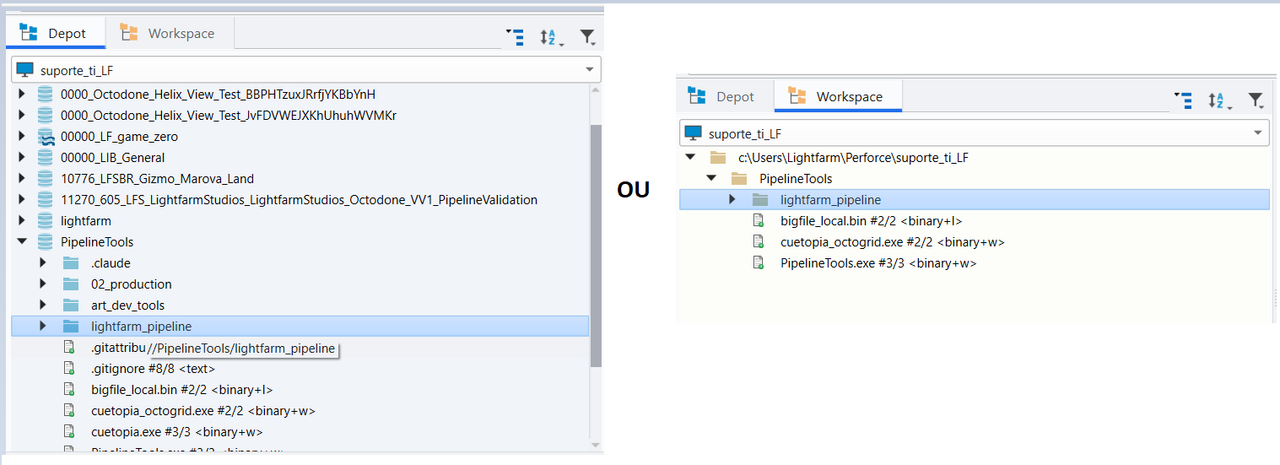
Localize o arquivo na aba Workspace ou Depot. - Clique com o botão direito → Check Out and Open.
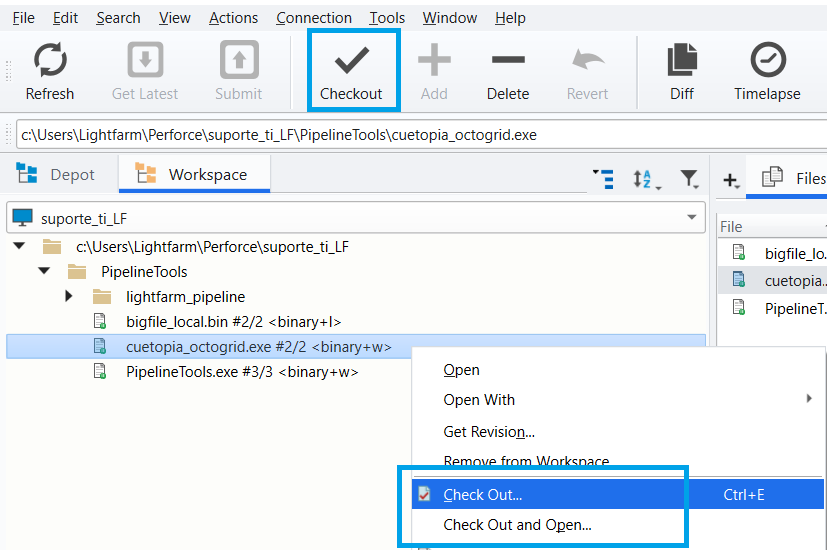
Clique com o botão direito → Check Out and Open. - O arquivo deixa de ser somente leitura e entra em uma changelist pendente.
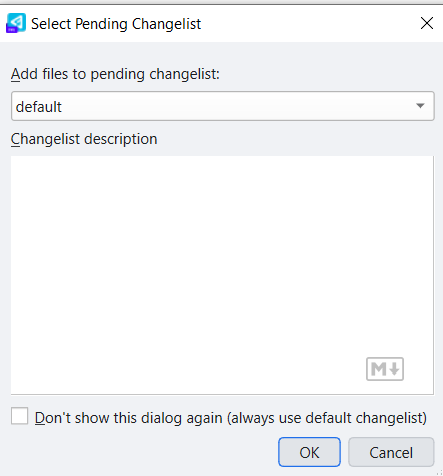
Arquivo em changelist pendente após o check-out.
Um arquivo nunca deve ser editado sem antes passar pelo check-out — isso pode gerar conflitos difíceis de resolver, já que o Perforce não terá registrado a intenção de edição.
Adicionando arquivos novos
- Coloque o novo arquivo dentro da pasta do workspace mapeada. Será possível observar que a nova pasta, no exemplo
10_ticom o arquivowindows.iso, não será listada.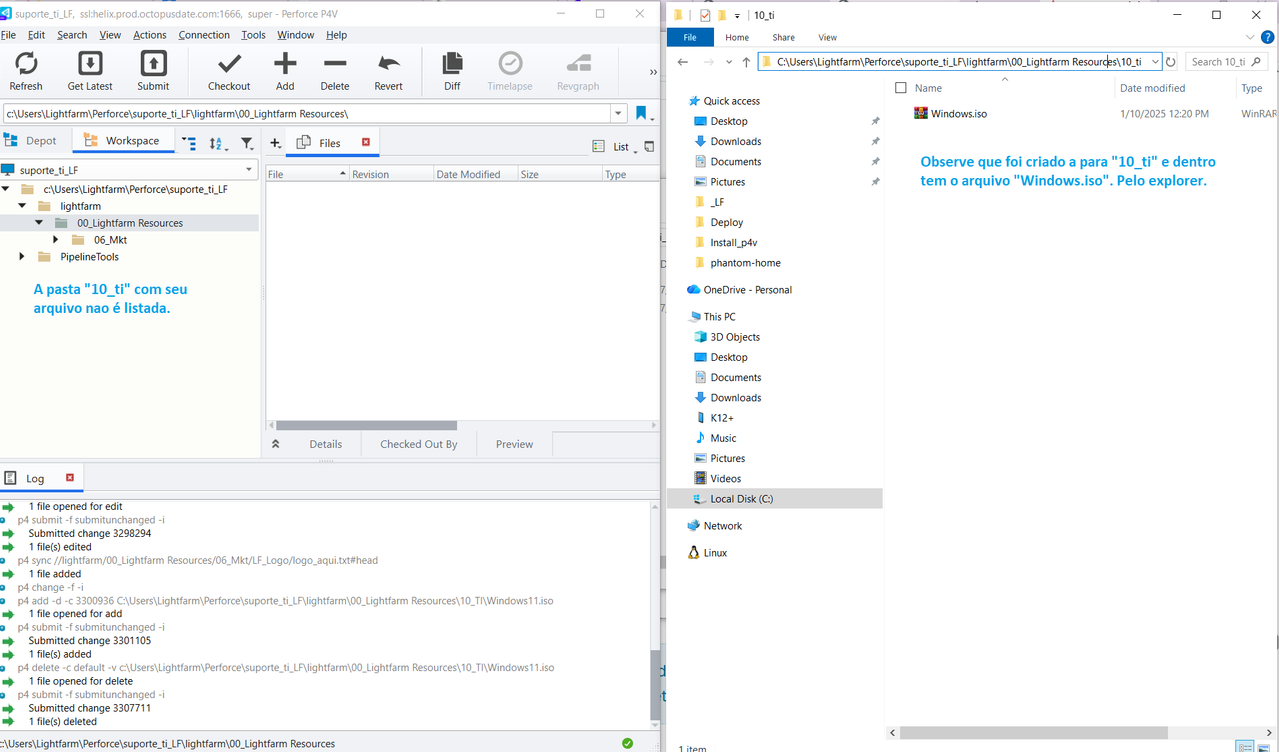
Pasta/arquivo novos no Explorer — ainda não aparecem no P4V. - Para que seja possível visualizar, clique em Refresh e será exibido.
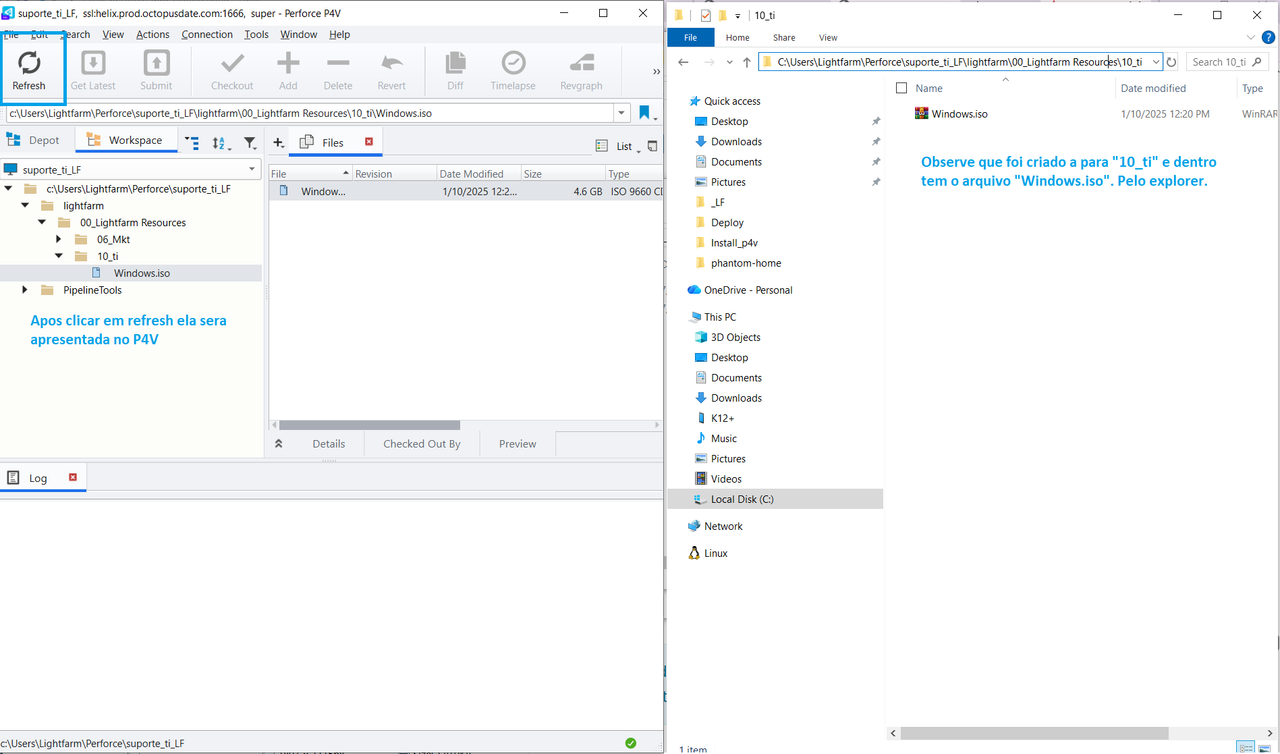
Após Refresh, o novo arquivo é exibido no P4V. - Clique com o botão direito ou no sinal de +.
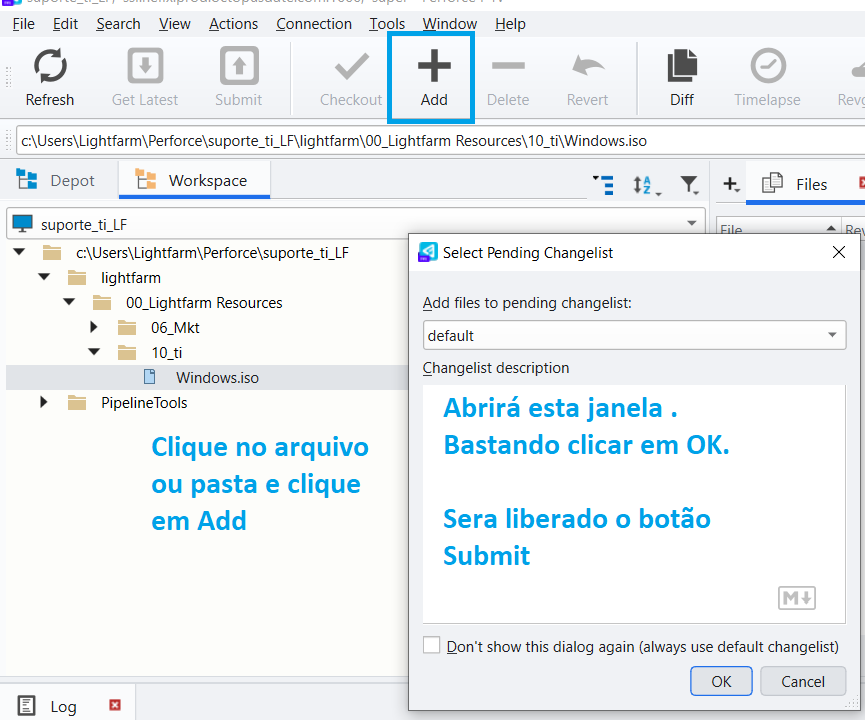
Clique com o botão direito ou no sinal de + — Mark for Add. - Inclua-o em uma changelist pendente.
Organizando e submetendo uma changelist
- Abra a aba Pending (atalho: Ctrl+1).
- Confira todos os arquivos incluídos.
- Escreva uma descrição clara do que foi alterado e por quê.
- Clique em Submit (atalho: Ctrl+S).
[Espaço para preencher: padrão de descrição de changelist adotado pela Lightfarm Studios — ex. referência a task/ticket, prefixo por projeto.]
Revertendo alterações
Use Revert no arquivo ou na changelist inteira para descartar alterações locais e voltar ao estado do depot.
Essa ação não pode ser desfeita — use com atenção.
04 Resolução de conflitos comuns
Conflito ao submeter (arquivo desatualizado)
Ocorre quando alguém submeteu uma versão mais nova do mesmo arquivo antes de você. O P4V indica que o arquivo precisa ser resolvido ("Resolve") antes da submissão.
- Sincronize a versão mais recente (Get Latest Revision).
- Clique com o botão direito na changelist → Resolve.
- Escolha aceitar a versão de origem, a sua (target), ou fazer merge manual.
- Depois de resolvido, submeta normalmente.
Arquivo travado (locked) por outra pessoa
Arquivos binários pesados e não-mesclaveis (assets de arte) costumam ser configurados para Exclusive Checkout, evitando que duas pessoas editem ao mesmo tempo.
- Verifique quem está com o arquivo travado na aba de propriedades do arquivo.
- Combine a liberação com a pessoa, ou aguarde a submissão dela.
- Em caso de não ser possível deslocar o arquivo, abra um chamado pelo link → https://forms.clickup.com/3093654/f/2yd4p-173067/0FYGMLRTHTHH0XNQ9Y.
Erro de permissão ao sincronizar ou submeter
Costuma indicar que o usuário não tem acesso configurado àquela parte do depot (ver Tabela de Proteções, seção 1).
- Confirme o caminho do depot que está tentando acessar.
- Contate o administrador do Perforce da Lightfarm para verificar as permissões da sua conta.
Workspace fora de sincronia ("out of date")
Acontece quando o workspace local ficou muito desatualizado em relação ao depot. Sincronize sempre no início do dia e antes de iniciar qualquer nova tarefa.
Observações importantes
Durante o uso do Helix Core, alguns hábitos são críticos para evitar problemas na pipeline:
- Não deixar arquivos em check-out por muito tempo: Arquivos travados impedem que outros artistas trabalhem neles. Submeta ao fim do dia.
- Zerar a Pending List diariamente: Ao sair ou fim do expediente, submeta todos os arquivos alterados. Se não tiver certeza quais foram editados, clique direito e escolha "Revert if Unchanged" para reverter os que não mudaram, mantendo apenas os de verdade alterados.
- Jamais editar arquivos fora do Helix: Não use Windows Explorer ou outro programa para mover, renomear ou editar arquivos do workspace. Isso quebra a sincronia. Use apenas as funções do Helix (Mark for Add, Rename/Move, Mark for Delete).
- Monitorar a barra de progresso: Quando executa uma ação (Get Latest, Submit, Check Out), o Helix mostra uma barra de progresso no canto inferior direito. Aguarde sempre o término antes de fazer outra ação, caso contrário pode acumular processos no servidor.
05 FAQ / troubleshooting / Suporte
Posso editar um arquivo sem fazer check-out antes?
Tecnicamente sim, mas o Perforce não vai reconhecer a intenção de edição, o que pode causar conflitos e perda de rastreabilidade. Sempre faça check-out antes de editar.
Qual a diferença entre Revert e Shelve?
Revert descarta as alterações locais permanentemente. Shelve guarda as alterações no servidor, sem submetê-las, para retomar depois — nada é perdido.
Por que meu arquivo aparece como "read-only"?
Arquivos sincronizados do depot ficam somente leitura por padrão até que você faça check-out neles. Isso é esperado e faz parte do modelo do Perforce.
O que fazer se o P4V não conectar ao servidor?
Confirmando que há internet, execute os comandos ping e tracert (Windows) / traceroute (macOS), para o endereço público do Helix, helix.prod.octopusdate.com. Abaixo segue o retorno dos comandos.
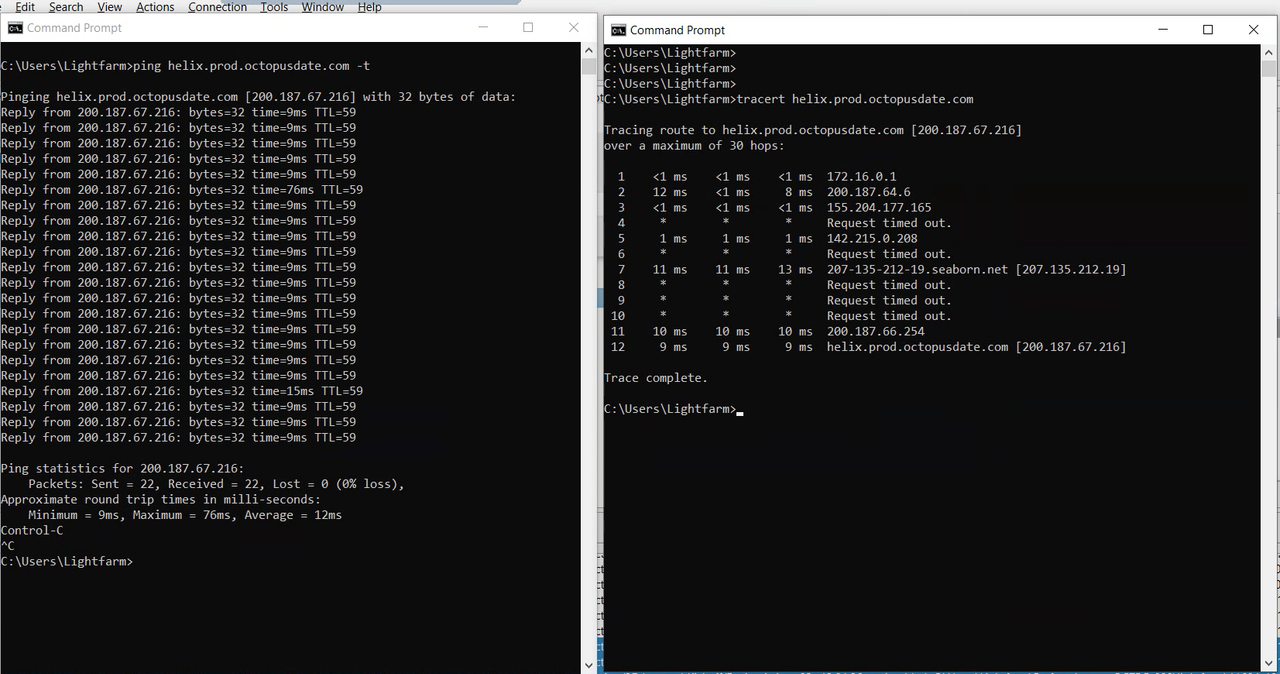
Caso a dificuldade persista, acesse o link → https://forms.clickup.com/3093654/f/2yd4p-173067/0FYGMLRTHTHH0XNQ9Y. Abra um ticket e envie as evidências.
Onde encontro mais ajuda dentro do próprio P4V?
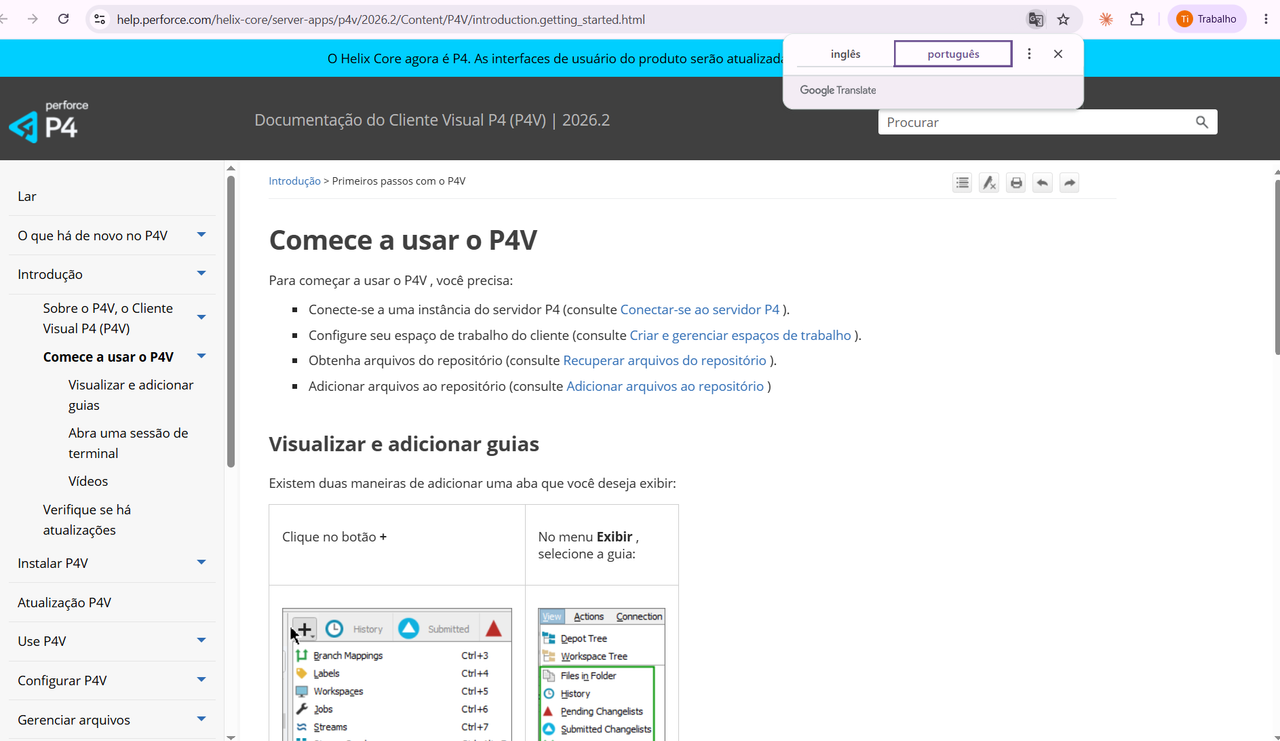
Com o P4V aberto, pressione F1 e você será direcionado para abrir a documentação oficial no navegador, https://help.perforce.com/helix-core/server-apps/p4v/2026.2/Content/P4V/introduction.getting_started.html. Onde encontrará mais conteúdos bem mais avançados do que o coberto neste manual introdutório.
Termino do manual — versão 2 rev 33 - 01/08/2026 - Documento em evolução . Deve ser atualizado conforme novos ajuste forem feitos pela equipe de TI do Lightfarm Studios.
Lightfarm Studios' version control guide for the art, design and development teams — from first login to the daily submit workflow.
Introduction
This manual presents Lightfarm Studios' official workflow for Perforce Helix Core using the P4V client. It was designed to serve as a quick day-to-day reference and as training material for new team members.
In March 2025 Perforce officially renamed "Helix Core" to "Perforce P4", unifying the product suite under the "P4 Platform" brand. The commands, the P4V client and the configuration files keep the same technical names — only the brand changed. Both names ("Helix Core" and "P4") are used interchangeably in the official documentation and in this manual.
How to use this manual
The content is organized into six parts, which can be read in sequence (for those just starting) or consulted individually (for those already using P4V day to day):
- Concepts and terminology — the essential Perforce vocabulary.
- Installation and connection — how to prepare the workstation and connect to the Lightfarm server.
- Daily workflow — sync, edit, submit.
- Streams and branching — how the Lightfarm pipeline organizes branches.
- Resolving common conflicts — what to do when something goes wrong.
- FAQ and troubleshooting — quick answers to the most frequent questions.
Leave this option OFF when creating the workspace. If enabled, it will download every file from every project, wasting disk space and sync time.
Visual summary
The image below summarizes, in a single panel, the essential concepts and the daily workflow detailed in the next sections. It works as a quick-reference poster — but it does not replace reading the full sections.
01 Concepts and terminology
Before operating P4V day to day, it is important to understand a few key terms. This section works as a reference glossary.
Centralized model (why it is not like Git)
Perforce uses a centralized version control model (CVCS — Centralized Version Control System). This means there is a single central server (the Depot) holding the "official" version of every file and the entire project history. Unlike tools such as Git, Helix Core operates under a centralization philosophy, ideal for the weight of CGI projects.
This architecture establishes a Single Source of Truth (SSOT): the central server retains the complete history, and the artist's computer (Workspace) only downloads the exact files needed at the moment, saving local storage and network bandwidth.
The basic workflow is:
- Sync the files from the server to the local machine.
- Check out the file before editing it.
- Edit the file locally.
- Submit the changes back to the server.
In Perforce, check-out happens before editing the file, not after. Synced files remain read-only until they are explicitly marked for editing — the main source of confusion for people coming from other version control systems.
Depot
It is the central repository, hosted on the Lightfarm Studios server, where all project files and their complete history are stored. It is the single "source of truth" — everything the team produces eventually lives there. Artists do not edit files directly in the Depot.
Workspace
The workspace is the mapping between a folder on a user's computer and a specific part of the depot on the server — their local "workbench". It defines which files that user syncs and in which local folder they appear.
Each team member should have their own workspace, configured only with the depot folders relevant to their role (art, design, programming, etc.), avoiding syncing the entire project unnecessarily.
Changelist
A changelist groups a set of modified files to be submitted together as an atomic unit: either every file in the changelist is written to the depot, or none is. If a 3D mesh and its texture are changed together, they go up in the same changelist; if the network drops, the whole submission is canceled, preventing a broken project on the server.
- Pending: changes in progress, not yet submitted.
- Shelved: changes temporarily stored on the server without being submitted — useful for code review by someone else, or to switch tasks without losing progress.
Basic file actions
| Action | What it does |
|---|---|
| Sync | Downloads the latest version from the depot to the local workspace. |
| Check-out (Edit) | Marks an existing file for editing, making it writable. |
| Add | Marks a new file (not yet in the depot) to be added. |
| Delete | Marks a file for removal from the depot. |
| Move/Rename | Moves or renames a versioned file, preserving its history. |
| Submit | Sends the changelist with the modifications to the depot, making them official. |
| Revert | Discards local changes and returns the file to the depot state. |
| Shelve | Stores a pending changelist on the server without submitting it. |
Streams
Streams organize branches into a parent-child hierarchy, which simplifies creating, merging and integrating them — especially useful in game development, where different teams work on separate features, releases or prototypes.
There are also Sparse Streams, a lightweight type of branch that can be created almost instantly, without physically duplicating every file.
P4V (P4 Visual Client)
It is the official graphical interface for accessing the Perforce server. In P4V, the left panel has the Depot and Workspace tabs, and the right panel holds configurable tabs (Pending, Submitted, History, etc.), which can be reopened at any time via the View menu.
History and visualization tools
- Revision Graph: graphically visualizes branches and integrations between them.
- Time-lapse View: shows all versions of a file side by side, indicating line by line who changed what and when.
- Diff Summary: compares file versions, including comparison with shelved changelists.
Binary files and Exclusive Checkout
The main reason Perforce is chosen in the VFX and games industry is its architecture optimized for heavy, non-mergeable binary files (e.g.: .ma .blend .zpr .exr .psd .uasset).
Instead of trying to "merge" impossible files (like 3D geometry), Helix Core uses a Global Lock (Exclusive Checkout / Lock). When an artist requests to edit (Check Out) a file configured this way, no one else in the studio can edit it until the work is submitted — eliminating work loss from overlapping conflicts.
Versioning: linearity and immutability
Helix Core's history is linear and immutable, allowing exact rollback to any previous revision in case of bugs. Combined with the concept of atomic changelists, this ensures the Depot is never left in an inconsistent state.
Security and permissions
File access can be controlled per directory or per individual file (ACLs / Protections Table), with a complete audit trail — protecting Lightfarm's Intellectual Property (IP):
| Feature | Description and practical use |
|---|---|
| Per-folder/file permissions | A freelancer can have access only to the specific folder of their asset, hiding the rest of the project. |
| Base access levels | Directors (read-only), Artists (write), Leads/Admins (super admin, able to unlock forgotten files). |
| IP address restriction | Blocks downloading top-secret files if the user is not on the internal network or the studio VPN. |
02 Installation and connection
This section covers preparing the workstation and the first connection to the Lightfarm Studios Perforce server.
Downloading and installing P4V
- Go to the official Perforce downloads page. -> https://www.perforce.com/downloads.
- Opening the link from step 1, you will be taken to the page below.
Perforce downloads page — under P4 Visual Client, click Customer Download. - Download the "Helix Visual Client (P4V)" matching the operating system in use (Windows/macOS/Linux).
Helix Visual Client (P4V) page — select the operating system and version to download. - Run the installer and follow the standard installation steps.
P4V installation — component selection.
P4V installation — step 2.
P4V installation — step 3.
P4V installation — finished.
First connection to the server
Open P4V. In the "Open Connection" window, fill in:
| Field | Value / description |
|---|---|
| Server | ssl:helix.prod.octopusdate.com:1666 — the official Lightfarm Studios server address. |
| User | Username assigned by the administrator. |
| Workspace | Name of the workspace to use or create in this connection (see next section). Leave blank on first login. |
On the first connection: Helix will ask about accepting an access key. Check Trust this fingerprint and click Connect. Then choose the Character Encoding: UTF-8.
Click OK.
- If the system is not configured yet, the "Character Encoding" window will appear — select UTF-8.
Character Encoding window — select the UTF-8 option. - Next, enter your password and click OK.
Enter the password and click OK. - The main P4V interface loads, showing the server repository (Depot).
Main P4V interface — showing the server repository (Depot).
Creating the workspace
All work in Perforce is done locally — you need to create a Workspace to map the server files to your local drive.
- In the Workspace dropdown menu, select New Workspace…
In the Workspace menu, choose New Workspace… - Fill in Workspace name following the pattern
artistName_LF(e.g.:joao_LF,maria_LF). - In Workspace root, set the local path (e.g.:
C:\Lightfarm_Jobs\<workspace>). Important: The path must NOT contain spaces, and must be in a local folder on the disk (e.g.:C:\Lightfarm_Jobs).
New Workspace configuration — Workspace root in a local folder. - Click OK to finish.
Do NOT create the workspace in folders synced with Dropbox, Google Drive, OneDrive or Megasync. These services can alter the file structure, breaking Helix Core's sync. Always use a conventional local folder on your disk.
Name the workspace in a standardized way; map only the depot folders relevant to your role; avoid syncing the entire depot unnecessarily — it overloads disk and network.
03 Daily workflow
The most frequently consulted section: the step by step of what to do every day when starting and finishing work.
According to the Perforce Helix Core Help, these are the possible statuses of a file on the server, and the corresponding indications for these statuses as formats and badges.
Start of the day: sync (Get Latest Revision)
- Open P4V and confirm you are connected to the correct workspace.
- In the Depot tab, navigate to the desired folder (e.g.:
PipelineTools).
Depot tab — navigate to the project folder. - Right-click and select Get Latest Revision.
Right-click and select Get Latest Revision. Or
Alternative — Get Latest Revision from the interface. - Wait for the progress bar to finish downloading to the local workspace.
Get Latest Revision progress bar in progress.
Always Sync before starting to work, to reduce the chance of bigger conflicts later.
Accessing the files locally
- Right-click the downloaded folder.
- Go to Show In → Explorer.
Explorer opened in the local directory of the synced files. - Explorer opens exactly in the local directory where the files are saved.
Explorer opened exactly in the local directory where the files are saved.
Checking out a file
- Locate the file in the Workspace or Depot tab.
Locate the file in the Workspace or Depot tab. - Right-click → Check Out and Open.
Right-click → Check Out and Open. - The file stops being read-only and enters a pending changelist.
File in a pending changelist after check-out.
A file should never be edited without first going through check-out — this can create conflicts that are hard to resolve, since Perforce will not have registered the intent to edit.
Adding new files
- Place the new file inside the mapped workspace folder. You will notice that the new folder, in the example
10_tiwith the filewindows.iso, will not be listed.
New folder/file in Explorer — not yet showing in P4V. - To make it visible, click Refresh and it will be displayed.
After Refresh, the new file is displayed in P4V. - Right-click or use the + sign.
Right-click or use the + sign — Mark for Add. - Include it in a pending changelist.
Organizing and submitting a changelist
- Open the Pending tab (shortcut: Ctrl+1).
- Review all included files.
- Write a clear description of what was changed and why.
- Click Submit (shortcut: Ctrl+S).
[To be filled in: changelist description standard adopted by Lightfarm Studios — e.g. task/ticket reference, per-project prefix.]
Reverting changes
Use Revert on the file or the entire changelist to discard local changes and return to the depot state.
This action cannot be undone — use it with care.
04 Resolving common conflicts
Conflict when submitting (outdated file)
Happens when someone submitted a newer version of the same file before you. P4V indicates the file needs to be resolved ("Resolve") before submission.
- Sync the latest version (Get Latest Revision).
- Right-click the changelist → Resolve.
- Choose to accept the source version, yours (target), or do a manual merge.
- Once resolved, submit normally.
File locked by someone else
Heavy, non-mergeable binary files (art assets) are usually configured for Exclusive Checkout, preventing two people from editing at the same time.
- Check who has the file locked in the file's properties tab.
- Arrange the release with that person, or wait for their submission.
- If it is not possible to free the file, open a ticket via the link → https://forms.clickup.com/3093654/f/2yd4p-173067/0FYGMLRTHTHH0XNQ9Y.
Permission error when syncing or submitting
Usually indicates the user does not have access configured for that part of the depot (see Protections Table, section 1).
- Confirm the depot path you are trying to access.
- Contact Lightfarm's Perforce administrator to check your account permissions.
Workspace out of date
Happens when the local workspace has fallen far behind the depot. Always sync at the start of the day and before starting any new task.
Important notes
While using Helix Core, a few habits are critical to avoid pipeline problems:
- Do not keep files checked out for too long: Locked files prevent other artists from working on them. Submit by the end of the day.
- Clear the Pending List daily: When leaving or at the end of the workday, submit all changed files. If you are not sure which ones were edited, right-click and choose "Revert if Unchanged" to revert the ones that did not change, keeping only the truly modified ones.
- Never edit files outside Helix: Do not use Windows Explorer or any other program to move, rename or edit workspace files. That breaks the sync. Use only Helix functions (Mark for Add, Rename/Move, Mark for Delete).
- Watch the progress bar: When you run an action (Get Latest, Submit, Check Out), Helix shows a progress bar in the bottom-right corner. Always wait for it to finish before issuing another action, otherwise you may pile up processes on the server.
05 FAQ / troubleshooting / Support
Can I edit a file without checking it out first?
Technically yes, but Perforce will not recognize the intent to edit, which can cause conflicts and loss of traceability. Always check out before editing.
What is the difference between Revert and Shelve?
Revert discards local changes permanently. Shelve stores the changes on the server, without submitting them, to resume later — nothing is lost.
Why does my file appear as "read-only"?
Files synced from the depot are read-only by default until you check them out. This is expected and part of the Perforce model.
What to do if P4V does not connect to the server?
Once you confirm there is internet, run the ping and tracert (Windows) / traceroute (macOS) commands against the public Helix address, helix.prod.octopusdate.com. Below is the output of the commands.
If the problem persists, access the link → https://forms.clickup.com/3093654/f/2yd4p-173067/0FYGMLRTHTHH0XNQ9Y. Open a ticket and send the evidence.
Where do I find more help inside P4V itself?
With P4V open, press F1 and you will be taken to the official documentation in the browser, https://help.perforce.com/helix-core/server-apps/p4v/2026.2/Content/P4V/introduction.getting_started.html. There you will find much more advanced content than what is covered in this introductory manual.
End of manual — version 2 rev 33 - 08/01/2026 - Living document. It should be updated as new adjustments are made by the Lightfarm Studios IT team.